How to Make Aroma Stones DIY
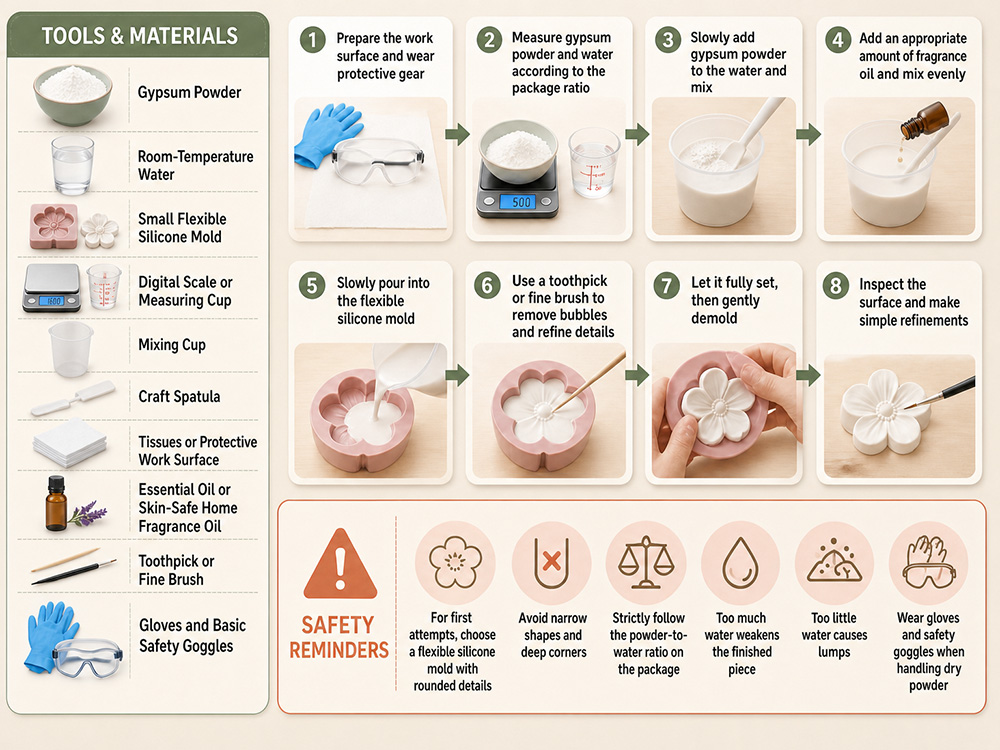
How to Make Aroma Stones DIY: A Simple Guide for Beginners
How to Make Aroma Stone at Home
Learning how to make aroma stone is a simple way to create natural home fragrance without heat, electricity, or an open flame. These porous pieces absorb essential oils and release their scent slowly, making them useful as drawer fresheners, bedside accents, bathroom decor, or handmade gifts. For another perspective on natural DIY fragrance stones, see this home-fragrance guide.
The basic method uses mineral powder, water, a mold, and fragrance. You will learn how to mix and pour the material, cure the finished pieces, add scent safely, and improve fragrance longevity. Careful measuring and gentle handling produce smoother, stronger aroma stones.
What Are Aroma Stones?
An aroma stone is a porous decorative object designed to absorb and diffuse fragrance. Unlike an ultrasonic diffuser, it does not need water, batteries, or a power outlet. Unlike a candle, it does not create heat or a flame. Its scent is released passively as the essential oil moves through the tiny pores in the material.
Many DIY aroma stones are made with stone gypsum, a fine gypsum-based casting powder. Some makers also use stone plaster, which is a broader term for mineral plaster products used in decorative crafts. For a practical example of plaster aroma stones, see this plaster-based aroma stone tutorial. The exact setting time, strength, and finish depend on the product, so always follow the mixing instructions supplied with your chosen powder.
A diffuser stone can be shaped as a disk, flower, shell, leaf, or geometric ornament, combining decor with passive fragrance.
Materials You Need for DIY Aroma Stones
Prepare the following supplies before you begin:
- Stone gypsum or a suitable stone plaster casting powder
- Clean water at room temperature
- A small silicone mold
- A digital scale or accurate measuring cup
- A mixing cup and craft spatula
- Paper towels or a protective work surface
- Essential oil or a skin-safe fragrance oil formulated for home fragrance
- A toothpick or fine brush for small surface details
- Gloves and basic eye protection when handling dry powder
Choose a flexible silicone mold with rounded details for your first project. Narrow shapes and deep corners can trap air and make demolding difficult. Follow the powder package's water-to-powder ratio instead of guessing: too much water weakens the piece, while too little creates lumps.
How to Make Aroma Stone Step by Step
1. Prepare the Workspace and Mold
Cover the work surface and make sure the mold is clean and completely dry. Place it on a level surface so the mixture sets evenly. If the mold has fine details, gently tap it once before pouring to make sure it sits flat.
Keep the workspace stable, and keep food, drinks, and pets away from the materials.

2. Measure the Stone Gypsum and Water
Weigh the stone gypsum and water separately, using the ratio recommended on the package. Different casting powders have different absorption rates and setting properties.
Add the water to the mixing cup before adding the powder. Sprinkle the powder into the water gradually rather than dumping it in all at once. This helps reduce dry pockets and makes the mixture easier to combine.

3. Mix Slowly Until Smooth
Stir slowly with a spatula until the mixture has a smooth, pourable consistency. Scrape the sides and bottom of the cup as you mix. Avoid vigorous whisking because it can introduce air bubbles that later appear as pinholes on the diffuser stone.
If the instructions recommend a brief soaking time, let the mixture rest and then mix gently again. It should be pourable, not watery.

4. Pour and Release Air Bubbles
Pour the mixture into the silicone mold in a thin stream. Fill each cavity carefully, stopping just below the rim if the design has a raised edge. Tap the sides of the mold lightly on the work surface to encourage trapped air to rise.
For detailed shapes, use a toothpick to guide the mixture into small corners, then leave the surface undisturbed as it thickens.

5. Let the Piece Set
Leave the mold undisturbed for the setting time stated on the package. Do not add essential oil while the mixture is wet, as it can interfere with curing and create a soft surface.
When the piece feels firm, gently flex the silicone mold and release the casting. If it bends, crumbles, or feels damp, allow more curing time before demolding.

6. Cure and Smooth the Aroma Stone
Place the demolded piece in a dry, well-ventilated area. Once fully dry, smooth rough edges with fine sandpaper and remove dust with a soft brush.
Do not seal the surface if you want the piece to absorb fragrance. Paint or varnish may reduce the porosity that makes an aroma stone work. If you want color, mix a small amount of mineral pigment into the casting material before pouring, and test compatibility first.

7. Add Essential Oil or Fragrance
Add fragrance only after the diffuser stone is dry. Place a few drops on the back or underside first, where marks are less visible. Allow the oil to absorb before adding more. Over-saturating the surface can cause staining, a greasy texture, or a stronger scent than intended. For a reference on how aroma stones work with essential oils, see this essential-oil aroma stone guide.
Refresh the fragrance gradually when it becomes faint. Longevity varies with the oil, stone size, airflow, and room temperature.

How to Make DIY Aroma Stones Last Longer
Use a dense but porous casting material, allow complete curing, and store unused pieces in a dry place. Larger stones usually hold more fragrance, while thinner pieces may release scent more quickly. Keeping a diffuser stone away from direct sunlight, heaters, and strong airflow can help slow evaporation.
For a balanced fragrance, use one or two compatible oils. Citrus, lavender, eucalyptus, cedarwood, and floral blends are popular choices.
Place the finished stone in a dish, tray, closet, drawer, or decorative bowl. Protect wood, fabric, and finished furniture from direct contact with essential oils. Use a separate stone for each fragrance profile.
Common Problems and Simple Fixes
The stone has many bubbles. Mix more slowly, tap the mold gently after pouring, and avoid adding unnecessary water.
The surface is chalky or fragile. Check the water-to-powder ratio and allow more curing time. Excess water is a common cause of weak castings.
The piece breaks during demolding. Wait longer before removing it and choose a shape without extremely thin sections.
The fragrance fades quickly. Make sure the stone is fully dry before scenting it, then store and display it away from heat and direct sunlight.
The oil leaves a mark. Use fewer drops, apply the oil to the underside, and place the stone on a washable dish.
Aroma Stone Safety Tips
Aroma stones are decorative fragrance tools, not skincare products or food items. Keep essential oils away from eyes, children, and animals, and follow each oil's safety instructions. Some oils may be unsuitable for pets, pregnancy, sensitive skin, or certain medical conditions. Never apply fragrance oil to skin unless it is specifically labeled for that use.
Handle dry powder carefully to avoid inhaling dust. Wash tools after use, and replace any stone that becomes heavily stained, oily, cracked, or damaged.
Frequently Asked Questions
Can I use regular plaster to make a diffuser stone?
Some plaster products can be used, but they may not have the same strength, smoothness, or absorption as a purpose-made stone plaster or stone gypsum product. Check the product instructions before using it for fragrance crafts.
How many drops of essential oil should I use?
Start with a small amount and add more only after the first application has absorbed. The correct amount depends on the stone’s size, porosity, and the fragrance’s strength.
Do aroma stones need water?
No. A dry diffuser stone releases fragrance passively and does not require water, electricity, heat, or batteries.
Can I paint DIY aroma stones?
Yes, but paint can block the pores and reduce fragrance absorption. If scent performance matters, leave the main absorption area unpainted or use color mixed into the casting material.
How long does an aroma stone hold its scent?
Scent life depends on the oil, stone size, room conditions, airflow, and absorbed fragrance. Refresh it when the aroma becomes faint.
Can I use fragrance oil instead of essential oil?
You can use a fragrance oil only when it is labeled for the intended home-fragrance application. Follow its safety guidance and test a small area first because some oils may discolor the stone.
Final Thoughts
Once you understand how to make aroma stone, you can create fragrance pieces in many shapes and colors. Accurate measuring, slow mixing, gentle bubble release, complete curing, and careful scenting are the essentials. Start with one simple mold and one fragrance, then experiment with colors, botanical shapes, seasonal designs, and personalized gifts.
Where do you put a car diffuser?
Why Does My Candle Tunnel? Causes, Fixes, and Prevention
Related Article